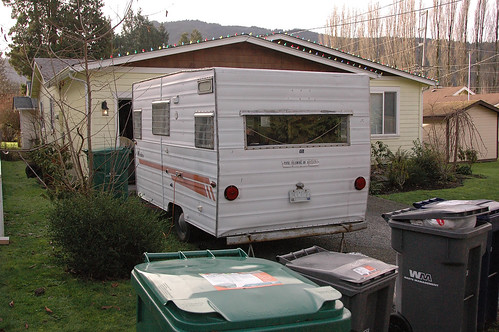
Whoops, I temporarily moved the trailer down to the end of the dead end street in front of my house... kinda hard to explain that without a picture or map... just think there is a gravel road that if you walk directly accross the street from my house it goes back about 1000 feet and feed a couple of houses accross the street. Anyways, not thinking about really securing the trailer as all I was doing was moving it 1000 feet or so, I forgot I had left a couple of beers, 1/3-1/2 full on the counter.. well anyone who's seen the Long Long Trailer will know things don't stay put unless they are secured properly. Well glass on formica is not secured properly and I had a lot of smelly, old beer to clean up tonight.
After I send the foam (luckily didn't get beer on them) home with my Dad tomorrow, I'm going to give her a good cleaning including steam mopping the floor. And get back to taping the trim off so I can finish painting and move forward in this thing.
Back to having a time limit getting this thing put back together, paint and all. Meister has a Travel Trailer for sale on CL that they inherited... brand new 21 foot Gazelle. We have to go camping before they sell it at least once. Good thing I have his wife, Nikki trying to convince my wife, Leslie to go. Didn't take much, Leslie's warming up to camping idea a bit more.
Saturday, March 28, 2009
12.25 yards of vinyl was ordered yesterday...
My foam should have covers here in the next few weeks. My dad is covering my foam in a nice deep textured brown vinyl. Looks a lot like leather, and it will go very nicely with the red appliances, curtains, flooring and wall color.
Both the Sofa and Dinette Benches will be done to look the same. top stiched, boxed ends, I can't wait to see the end result!
Need anything recovered?? Call Tim Blumenstein, Perfection Interiors, 253-833-4386. He's been doing this for 41 years now, and recently recovered my friend andy's interior in his 71 LoLiner too.
Trailer brakes will be functioning soon!
Well it's kinda state law here in Washingotn, if your trailer has brakes, you are required to have them hooked up and working. Not that I really NEED them, The tiguan does a really good job of stopping both the car and the trailer, even fully loaded, but I don't want to explain to a 5-year-old's Mom why I didn't have them functioning after he runs in front of me. :( sorry for the downer...
I got a really good deal on Ebay, $21, and it has dual thumb rollers to adjust soft and hard stops, and a manual override. It's a AccuTrac SX by Accupower products.
This and a break away switch will go in very soon. Stay tuned for that.
I got a really good deal on Ebay, $21, and it has dual thumb rollers to adjust soft and hard stops, and a manual override. It's a AccuTrac SX by Accupower products.
This and a break away switch will go in very soon. Stay tuned for that.
new tires, and a now we are self contained!
So I picked up a couple really good deals on the Seattle Craigslist, 1st was a pair of almost brand new tires, 1433 load rating each at 35psi, so I should be more than good there. I went with a 205/70/14 instead of the 195/75/14 that is on there, because my spare is also a 205/70/14. Now all three match again! Had to settle for blackwalls, fir for $15 for the pair, I'm not complaining.
then, just after I missed camping worlsd being open one night, when I was going to buy a Porta Potty, I decided to check the good old craigslist again... I know what you are thinking, but in this case, it's brand new for only $30!!! The exact same one at Camping World would have run me $79.99 + Tax (they have free shipping right now too).
So, now I'm fully self contained, all three systems work, fresh water, toilet. Good to go!
(I did however find out my water pump although works, went bad. it will not hold it's prime and doesn't have enough umph to get the water to actually come out of the faucet. I will be replacing that one with a hand pump faucet also from Camping World. The same thing at Vintage Trailer supply? $10 more with no apperant benefit. I guess you win some and lose some with VTS.
Friday, March 27, 2009
Finally fixed my dead battery... well, 1 of 2 at least.
I had bought a Optima Red Top a little over two years ago for the Passat I had (totaled 3/24/07) the battery was pulled from the wrecked car, only after being completely drained.
Well, not having a charger at the time just put it on the shelf in my garage and forgot about it, for two years now. Basically the electrolytes in the water attach themself to the plates, and they choke the battery from being able to re-charge properly... 3 of my 6 cells were sulphated, that is why I couldn't get more than about 5.5v charge to stick (2.2v/cell), it would just drain overnight. You have to "shock it" back to life to turn that sulfate collections to Electrolytes, and allow the plates to except the charge.
So I followed these steps:
- Connect a known good battery (12.6 - 12.8v) to the dead battery in parallel (+ to +, - to -) with jumper cables.
- Connect the charger to the Battery to start charging it.
- Check every hour or so until the dead battery is at least 10.5v (min for an auto charger to recognize it as a good battery)
- Continue to charge the prevously dead battery until the Charger shuts off (or it gets too hot, it can get warm, but not hot).
- Wait 24 hours for the surface charge to dissapate (mine ended up at 14.23v)
- Properly maintain the battery with a solar charger, or maintainer charger.
Well it seemed to work with the Red Top (due to spiral cores of their plates and the very low internal resistance), I'll give this a try with the deep cycle (Marine/RV) that came with the trailer too, maybe I can get some life out of the old girl after all.
Wednesday, March 25, 2009
New Generator
I sold my generator I had, used it once for a backup power source, and I was thinking of bringing it along when we were out in the sticks for portable power. 6.5 hp, 4 gallons, 4000 watts... way too much. It was like having a Hummer for a commuter car... just a bit excessive. So I bought a Honda instead... well not really a honda, commuter car metaphore.
I got it at Costco, ($219) it's a great little generator, 1850 watt, 1.3 gallon tank, will run 4 hours at 1/2 load... plenty enough to run the essentials camping in the sticks (lights, 12v charger, fridge... you get the idea.) For as much as I will probably not use it, it will work just fine and I will get my money out of it 10 fold. If you compare this to a Honda EU2000i at $1000, I'd say I got a pretty good deal. The Honda is 59db, this one is at 64db, but noise is noise I guess.
So I swapped out this one (100 pounds, no wheels):

for this one (60 pounds with wheels and enclosed):


Product Details:
Introducing the 2009 2.4 Horse Power 4 Stroke Air-Cooled 1850 Watt Powermight Portable Generator! Strong, Reliable, Economical and Practical, this is the most modern quietest enclosed generator on the market today making it ideal for all outdoor recreational activities. Weighing in at only 60lbs this ultra quiet portable generator combines power and portability. The PowerMight 1850 is equipped with an extending arm with handle for easy rolling, which makes it very convenient to bring anywhere you go!
Features & Specifications
Engine: 2.4 Horse Power, Air-Cooled, 4-Stroke OHV Gasoline Powered
Displacement: 79.0 cc
Fuel Tank: 1.3 Gallon / 4.9 Liter
Rated Voltage: 120 VAC
Rated Frequency: 60 Hz
Rated AC Output: 1200 Watt
Peak AC Output: 1850 Watt
Rated DC Output: 12 V
Rated DC Current: 8.3 A
Noise Level: 64 DB measured from 20’ away
Weight: 60lbs
Dimensions: 18.5” x 15” x 19”
1 Year Warranty
I got it at Costco, ($219) it's a great little generator, 1850 watt, 1.3 gallon tank, will run 4 hours at 1/2 load... plenty enough to run the essentials camping in the sticks (lights, 12v charger, fridge... you get the idea.) For as much as I will probably not use it, it will work just fine and I will get my money out of it 10 fold. If you compare this to a Honda EU2000i at $1000, I'd say I got a pretty good deal. The Honda is 59db, this one is at 64db, but noise is noise I guess.
So I swapped out this one (100 pounds, no wheels):
for this one (60 pounds with wheels and enclosed):
Product Details:
Introducing the 2009 2.4 Horse Power 4 Stroke Air-Cooled 1850 Watt Powermight Portable Generator! Strong, Reliable, Economical and Practical, this is the most modern quietest enclosed generator on the market today making it ideal for all outdoor recreational activities. Weighing in at only 60lbs this ultra quiet portable generator combines power and portability. The PowerMight 1850 is equipped with an extending arm with handle for easy rolling, which makes it very convenient to bring anywhere you go!
Features & Specifications
Engine: 2.4 Horse Power, Air-Cooled, 4-Stroke OHV Gasoline Powered
Displacement: 79.0 cc
Fuel Tank: 1.3 Gallon / 4.9 Liter
Rated Voltage: 120 VAC
Rated Frequency: 60 Hz
Rated AC Output: 1200 Watt
Peak AC Output: 1850 Watt
Rated DC Output: 12 V
Rated DC Current: 8.3 A
Noise Level: 64 DB measured from 20’ away
Weight: 60lbs
Dimensions: 18.5” x 15” x 19”
1 Year Warranty
Tuesday, March 24, 2009
Left To Do List, Right?
So this is what I have left in the near future on the Trailer:
- Paint the Interior. The walls Tawny, the ceiling flat white, The cupboards bunk and closet glossy white. Still need to put a 2nd coat on the red items.
- Finish the Cushions. I am orderin gthe brown vinyl thru my dad and having it all stitched up. Can't wait!
- Tint the windows, all of them. Clean up the frames a bit while the glass is out, paint silver or powdercoat maybe? This may need to wait for a couple warm, dry days.
- Polish and Re-install the trim around the windows.
- Trim the rest of the counter, wall-cupboard seams, and floor.
- Polish the interior trim a bit more... it could use it.
- Polish the backsplash and sidesplash
- Install the curtain rods over and under the windows
- Sew the curtains and install, might actually do this one myself, just for fun!
- Weld the rear bumper and straiten it. Might cut it off first and shorten it a bit.
- Install metal casters underneath in case the tail bottoms out on a driveway again (why I'm welding the bumper)
- Sand and paint the bumper, step and tongue.
- Sometime this summer, repaint the exterior.
- Sand paint and install all the new badges (thanks Rex)
should I say it? It would be done? :)
Heater exchanged
So I got this heater a while ago at Costco, and it was fine while I was working on the trailer, didn't really think much of it, until we tried to sleep with it. VERY noisy when you are trying to sleep and it clicks on and off with a fan. So I took it back to Costco (they are great about returns!) and found myself a new heater on clearance at Home Depot. Thank god for spring clearance, I found a great flat panel radiant heater normal price, $71.99. On the shelf for $44.95. Talked him down on the final unit to $19.00!! :)
So I built some more stuff...
When I cut the Upper cupboard doors I only measured the ones above the kichenette... assuming all 4 would be the same. Well it really doesn't matter becasue I used the entire 96" length of the plywood, and got 4 24" doors... well the ones over the sofa were supposed to be 26", so I wasn't about to buy new sheets of plywood, no way. Plus when removing the walls a bit of the cupboard face got torn up a bit.
I cut a few 1x3's to make the cupboard hole a bit smaller, then refaced the cabinet with more luan plywood. Done and done! Just need ssome filler sanding and a few coats of paint to be good as new, and now the doors fit right.
Built a shelf and divider for the closet to house the microwave and keep it put. It's now on the right side of the closet up top in it's own little cubby. The cord ran down the back and plugged into the outlet on the lower shelf.
2/28 - 3/1 Our Maiden Voyage!
What a great camping trip! We had a blast, even my lovely wife, who is not the most outdoorsy type, her idea of a vacation is a hotel room and room service... so Coffee and breakfast in bed was in order! :)
We stayed at Fort Worden State Park in beautiful Port Townsend, WA. We didn't pick that by chance, it was the weekend of the annual Achtuning Port Townsend Vw and All European Car Cruise. Just us and 400 or so of my close friends.
We went out the night before, on Saturday to enjoy the parts of Pt. Townsend that we normally miss as we are always so rushed on the cruises... Driver's Meeting, The Drive, Parking, Lunch, regroup for the Photo, Regrouping fr the drive home, Exiting, Drive Home and Done... wait, what town did we visit again? Yea, so we went a different route this year, and now I can't wait to go camping again!

CLICK PHOTO TO SEE ENTIRE SET ON FLICKR.
We stayed at Fort Worden State Park in beautiful Port Townsend, WA. We didn't pick that by chance, it was the weekend of the annual Achtuning Port Townsend Vw and All European Car Cruise. Just us and 400 or so of my close friends.
We went out the night before, on Saturday to enjoy the parts of Pt. Townsend that we normally miss as we are always so rushed on the cruises... Driver's Meeting, The Drive, Parking, Lunch, regroup for the Photo, Regrouping fr the drive home, Exiting, Drive Home and Done... wait, what town did we visit again? Yea, so we went a different route this year, and now I can't wait to go camping again!
CLICK PHOTO TO SEE ENTIRE SET ON FLICKR.
A few last minute things before our trip
So the last minute things included:
- Building a new baggage door. This one is insulated like the rest of the walls, and sealed.
- Installing all the new handles, hinges and catches on the drawers and cupboard doors.
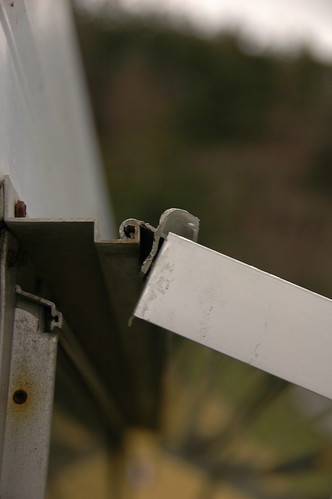
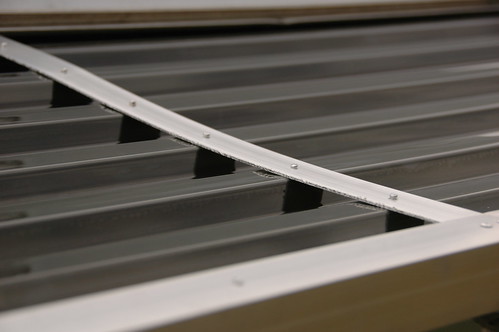
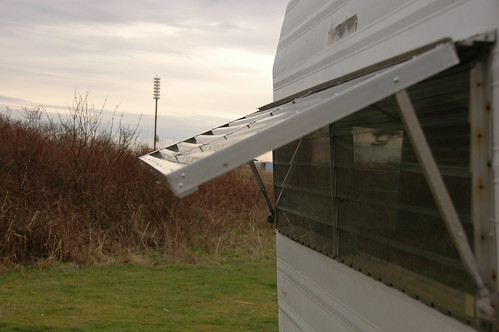
- Building a new Rock Guard (1.5" L channel Aluminum and Smoked Polycarbonate)
- Squaring away the plumbing, incoming city and Grey water drain system.
- Lining the cupboards with non slip stuff
- packing her up.
I won't go into too much detail about much except the Rock Guard, pretty proud of that. I dismantled a rock guard I bought but was a bit too small for the windows, why I forgot to measure I don't know.... but it worked out in the end.
I bought two 8' 1.5x1.5 L-channel sticks, and after cutting them 3" too long for my measurements I proceeded to notch a 1.5"x1.5" square out of one side of both ends then proceeded to bend that extra tab left over to build a boxed end. I clamped, drilled and rivited the two lower corners together before attaching them to the original hinge that happened to still be attached to the trailer. Once the frame was complete I cut the Poly sheet to fit and riveted that to the frame too. I had to rebuild the hinges a bit to make them work right, but after attaching thos to the frame and the trailer, I drilled a few holes for 3 open positions and one locked position. Everything works great. I'm still deciding on how to rebuild the centersupport, that didn't work out too well, it's there for looks right now.
Stopped off at Camping World for a few last minutes things and we were on our way for our first trip!


NEW FOAM!!
Yay! I got new foam to sit and sleep on. Luckily my father is an Uphulsterer and he had a bunch of old foam laying in his foam pile. We were able to find enough to build the two lower beds, the Sofa and Dinette cushions. We will be wrapping these in Fabric soon enough, leaning towards Brown leather-look vinyl. Stay tuned for that. Almost ready for our first trip!
New Fuse Box and Outlets
So I replaced the original '66 GE 110v fuse box with a newer Square D box. New is not always better, I know, but this box had two slots with 3 breakers, and I needed a couple more breakers. I added a dedicated line to the fridge mounted behind the small door at the bottom of the drawers. The 2nd new line added 4 new duplex grounded outlets; 1st under the cupboard above the sink/counter area, 2nd is on the sofa side of the kitchenette, 3rd in the run is down by our feet in the dinnette area, and the 4th is in the closet for hairdryers and the new Microwave. THe Lights are still wired as they were on the 3rd Breaker.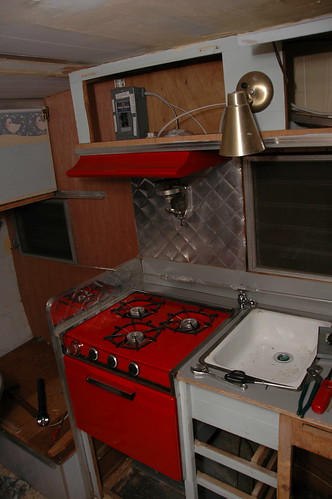
.
.
Saturday, March 21, 2009
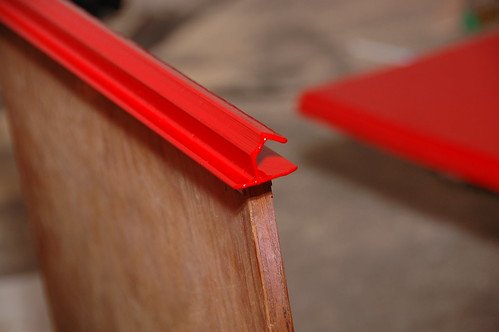
Red Paint
So this shows the match of the two Red mediums, paint and powdercoat. It's not exact, but if you knew what I went tru to get this you would understand.
I went to Lowes to "colormatch" that hood vent to a couple quarts of Red Paint... nothing in the 10,000 colors they have came anywhere close. I mean nowhere!
The problem lies in the amount of pure red dye that is required to make a pure white gallon or quart of paint that same pure, bright lipstick meets coca-cola red. It would overfill the gallon of paint and water down the paint to a unusable level.
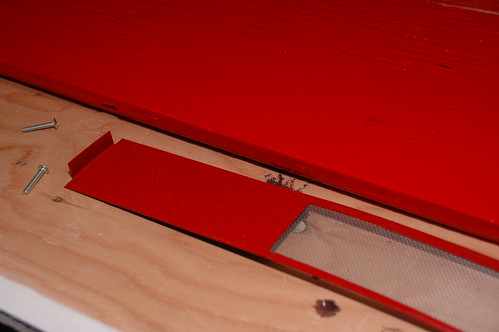
I ended up getting off the shelf two quarts of rustolium "Safety Red". These are the drawers from the closet.

Cutting Board
In the forground you see the 4 Upper cupboard door faces (New) and the two lower cupboard doors (also new. These were cut out of the same sheet of 5/8 + 1/4" luan glued together that I made the new Closet doors out of (in the background).

Here is a taste of what the Interior will look like with new Chrome hardware and Red paint.

I went to Lowes to "colormatch" that hood vent to a couple quarts of Red Paint... nothing in the 10,000 colors they have came anywhere close. I mean nowhere!
The problem lies in the amount of pure red dye that is required to make a pure white gallon or quart of paint that same pure, bright lipstick meets coca-cola red. It would overfill the gallon of paint and water down the paint to a unusable level.
I ended up getting off the shelf two quarts of rustolium "Safety Red". These are the drawers from the closet.
Cutting Board
In the forground you see the 4 Upper cupboard door faces (New) and the two lower cupboard doors (also new. These were cut out of the same sheet of 5/8 + 1/4" luan glued together that I made the new Closet doors out of (in the background).
Here is a taste of what the Interior will look like with new Chrome hardware and Red paint.
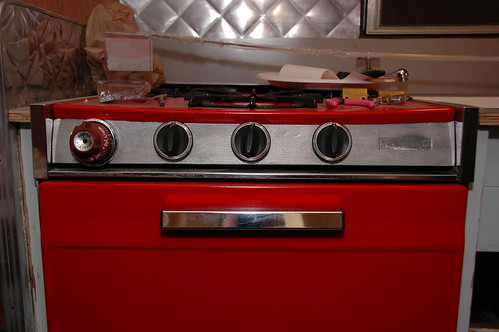
Powdercoating Appliances.
One of the most dramatic changes so far is the appliances. This was the cornerstone of all of the other Vintage interiors... old princess stoves in Pink, Yellow, Green, Turquiose, White... you name it!
Well this factory almond was not cutting it for me, it was too drab.
So I paid a visit to my good friend Dave Meister, owner of Meister Gauge Faces, and he has the setup to powdercoat smaller items, my appliances were just small enough to fit so I chose RED!


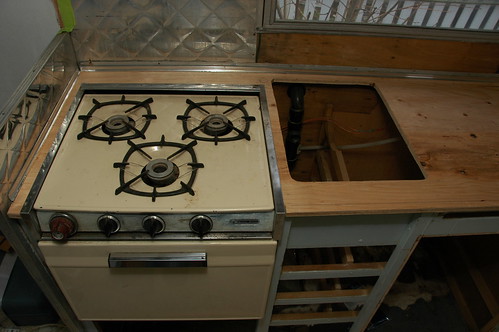
We did all that you see here, vent hood and screen, oven door, and stove top. They turned out FANTASTIC!!!
I added the tin trim piece to the front of the Stove, it needed a bit of silver to break up the red, I think I will eventually take that red piece and throw a coat of Chrome powdercoating right over the top, it will look a bit cleaner than this old piece.
Well this factory almond was not cutting it for me, it was too drab.
So I paid a visit to my good friend Dave Meister, owner of Meister Gauge Faces, and he has the setup to powdercoat smaller items, my appliances were just small enough to fit so I chose RED!
We did all that you see here, vent hood and screen, oven door, and stove top. They turned out FANTASTIC!!!
I added the tin trim piece to the front of the Stove, it needed a bit of silver to break up the red, I think I will eventually take that red piece and throw a coat of Chrome powdercoating right over the top, it will look a bit cleaner than this old piece.
Next, I found the perfect match to the red powdercoating for the rest of the interior... right off the shelf!
New Formica
Well, I'll make this one quick... I replaced all of the formica with new "Brushed Aluminum" look formica. Rough cuts and final cuts were done with a router, glued down with contact cement. Pretty quick process for the most part, I think I got this all done in a few hours work, (a few more to let it set up).
The table and the cupboard ends are the original plywood just flipped over (so the original formica is still there underneath). The back splash, side splash and kitchenette counter is all new.
Didn't taka a lot of pictures of this yet without the new powdercoated appliances, so this is all you get to see until the next post.

Next up Powdercoating and paint, bring on the RED!!!
The table and the cupboard ends are the original plywood just flipped over (so the original formica is still there underneath). The back splash, side splash and kitchenette counter is all new.
Didn't taka a lot of pictures of this yet without the new powdercoated appliances, so this is all you get to see until the next post.
Next up Powdercoating and paint, bring on the RED!!!
Walls walls walls
So the walls are a funny story, I'll start with a lesson I learned along the way: "When you start to dig into the walls on an old trailer, you best be prepared to replace the whole wall." Lesson Learned from this, my first Vintage trailer. Better yet, best to just take the skin off, rebuild the frame, then repanel all of the walls inside... as big of a job that sounds, that might have saved me a lot of time!
I started with the swell idea to rip off all of the old wallpaper, then when that didn't come off, removed teh raised portions of the typical 60's wood panels, then primer the walls, and cover them with this special panel-cover wallpaper to cover up all the unsightly ripples and water damage the previous owner had covered up with their wallpaper. I should have just re-papered right over the old stuff and saved myself a lot of time and trouble... but this is how it went:
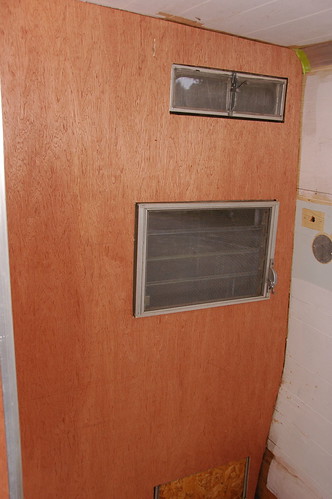
So after trying to primer the walls to paper them, I decided to cut out the 'cancer' and replace it with a few sheets of 1/4" Luan I had. Here is an example of where the cancer was:
Well, the old walls didn't match the new walls too well. So I ended up just ripping the whole walls off, using the wall board as a template and cutting new walls out of the 1/4" Luan birch plywood.
This shot shows you how these trailers are built, that's a 1x2 pine frame, the pink metal you see is the back side of the outer skin (white and red outside)
Then goes 3/4" insulation... this is 3 times more they put in here at the factory!! I used plumbing pipe wrap insulation. Lowes sells this for about $3 for a 18"x 6' roll(Home depot? over $5 for the exact same product - brand and all!!). Green tape keeps it in place for the siding to go up.
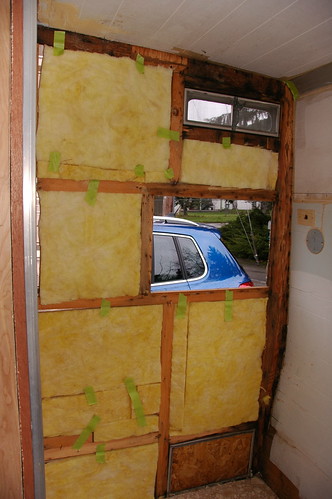
This is what it looks like with the wall back in place. This will be eventually painted "Tawny", kind of a sand/beige color we had used in our house remodel, I have a few gallons left over still.
All 4 corners were re-done. Each corner needed a lot of re-structure building and a lot of 2" brad nails toenailing the frame back together. They use a 5/8" x 1" staple to put these frames together... not the greatest over 40+ years.
Next up, new countertop and table formica.
I started with the swell idea to rip off all of the old wallpaper, then when that didn't come off, removed teh raised portions of the typical 60's wood panels, then primer the walls, and cover them with this special panel-cover wallpaper to cover up all the unsightly ripples and water damage the previous owner had covered up with their wallpaper. I should have just re-papered right over the old stuff and saved myself a lot of time and trouble... but this is how it went:
So after trying to primer the walls to paper them, I decided to cut out the 'cancer' and replace it with a few sheets of 1/4" Luan I had. Here is an example of where the cancer was:
Well, the old walls didn't match the new walls too well. So I ended up just ripping the whole walls off, using the wall board as a template and cutting new walls out of the 1/4" Luan birch plywood.
This shot shows you how these trailers are built, that's a 1x2 pine frame, the pink metal you see is the back side of the outer skin (white and red outside)
Then goes 3/4" insulation... this is 3 times more they put in here at the factory!! I used plumbing pipe wrap insulation. Lowes sells this for about $3 for a 18"x 6' roll(Home depot? over $5 for the exact same product - brand and all!!). Green tape keeps it in place for the siding to go up.
This is what it looks like with the wall back in place. This will be eventually painted "Tawny", kind of a sand/beige color we had used in our house remodel, I have a few gallons left over still.
All 4 corners were re-done. Each corner needed a lot of re-structure building and a lot of 2" brad nails toenailing the frame back together. They use a 5/8" x 1" staple to put these frames together... not the greatest over 40+ years.
Next up, new countertop and table formica.
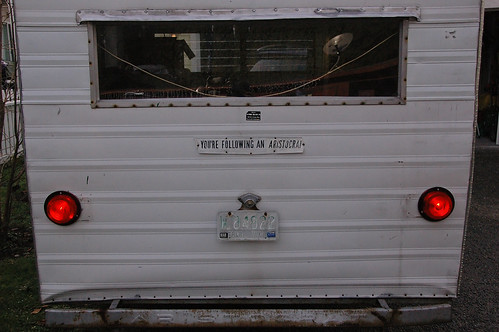
Tail Lights
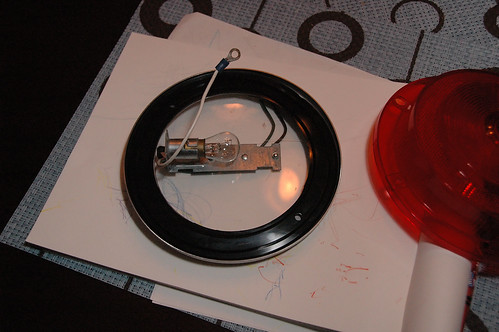
So I bought some Reflect-o-lite 110 150 Tails from Vintage Trailer Supply however the mounting backplates are no longer in production, so I had to get creative and make my own.
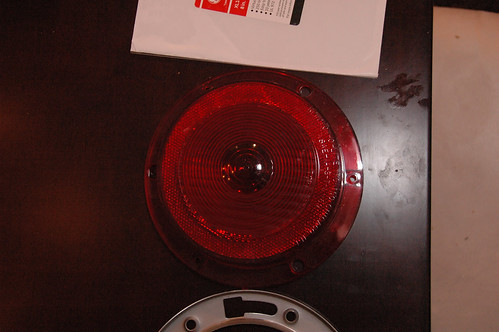
Started with a Closet Base, wax freee gasket, small piece of Lexan, and the parts from the old Lights from the trailer.


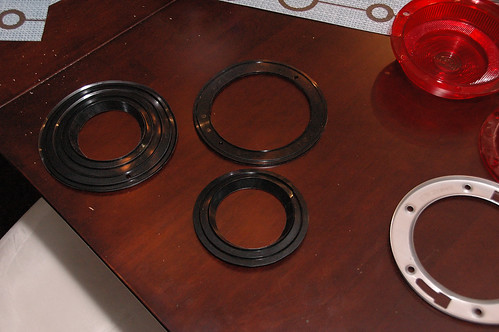
I cut out the center few rings from the vinyl gaskets like so.
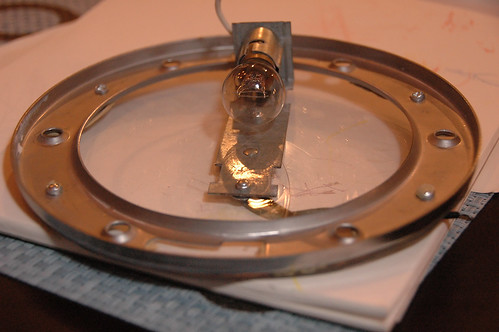
Cut the Lexan to size and riveted it to the closet bases. Riveted the bulb holders to the lexan.
Back side (this is what goes against the trailer)

Side view.

Done with that project!
Next up, fix the walls!!!
Started with a Closet Base, wax freee gasket, small piece of Lexan, and the parts from the old Lights from the trailer.
I cut out the center few rings from the vinyl gaskets like so.
Cut the Lexan to size and riveted it to the closet bases. Riveted the bulb holders to the lexan.
Back side (this is what goes against the trailer)
The vinyl gaskets fit perfectly to seal the lights, and gave them a slightly tinted look as well.
Wired them up, sealed them with some putty tape and screwed them on. Works and looks much better!
Wired them up, sealed them with some putty tape and screwed them on. Works and looks much better!
Side view.
Done with that project!
Next up, fix the walls!!!
Let's put the closet back together... wait...where's my notes??
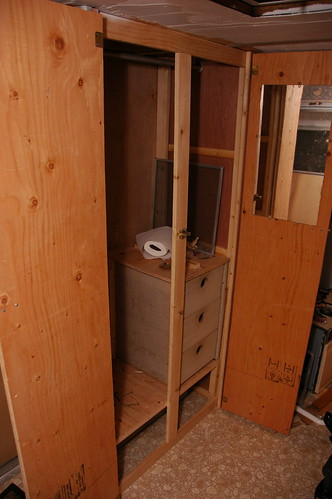
Okay so the wall was replaced, the floor was replaced... I didn't take really good notes... so how did I rebuild the closet? Trial and error and the marks on the ceiling!
First section in place, simple 2x3, 1x2 and Luan (1/4" birch plywood) construction.

Notice the ceiling? that was my guide for measurements. This piece got screwed in to the door frame, also from the outside, and down into the floor.

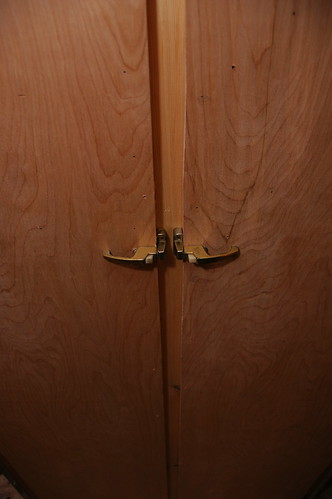
The face went on next, this had to be rebuilt a few times... looked nice here, didn't figure the doors out until they were hung. That center board was supposed to be flush with the cross piece. Oops!

Put the other side in (before I figured out the front rebuild)

After rebuild # 3, I think. Doors hung, latches lined up... good.

First section in place, simple 2x3, 1x2 and Luan (1/4" birch plywood) construction.
Notice the ceiling? that was my guide for measurements. This piece got screwed in to the door frame, also from the outside, and down into the floor.
The face went on next, this had to be rebuilt a few times... looked nice here, didn't figure the doors out until they were hung. That center board was supposed to be flush with the cross piece. Oops!
Put the other side in (before I figured out the front rebuild)
After rebuild # 3, I think. Doors hung, latches lined up... good.
Used the old handle and latches... they are pretty cool and in good condition still.
Built new shelves, but used the old drawers. The mirror found it's way inside the closet door.
Next up: Tail lights!
Built new shelves, but used the old drawers. The mirror found it's way inside the closet door.
Next up: Tail lights!
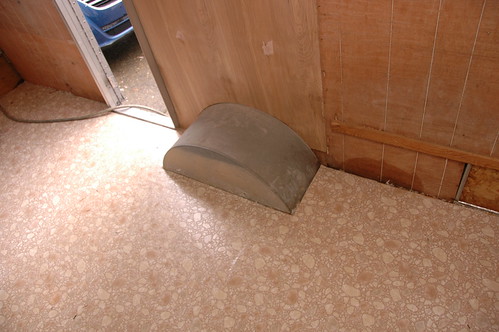
Let's get started, shall we?
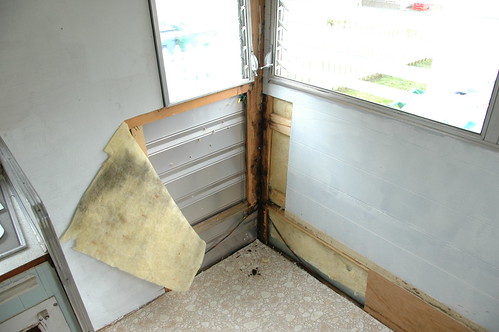
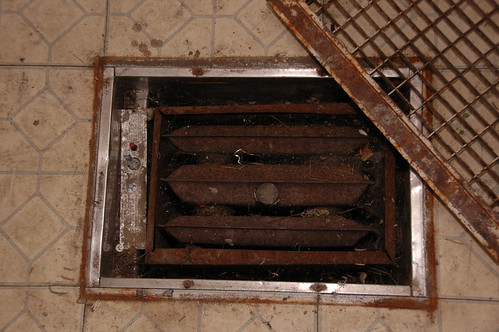
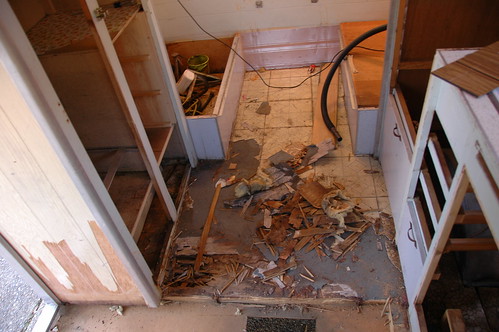
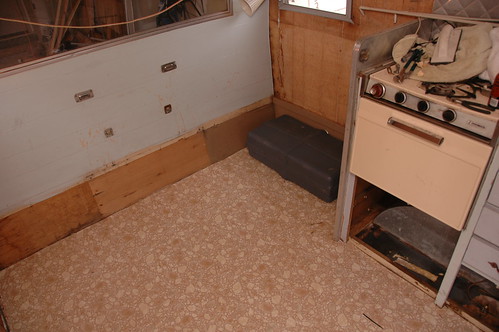
Let's get right into it... no messing around! Why they thought this would be a good idea to have a heater in the floor? I don' tknow... this was right below the leaking vent, water pooled here and destroyed the radiator, and the floor around this... it had to go!
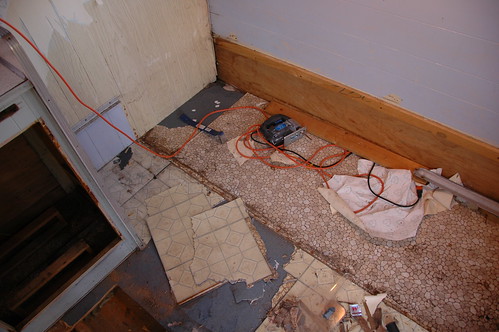
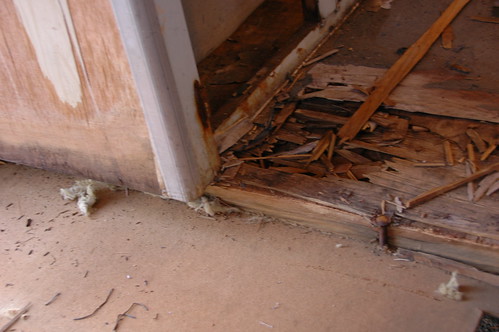
So out it came and I found myself removing a lot of flooring... all the way to the door crumbled once I got that vinyl tile up. Here we go.

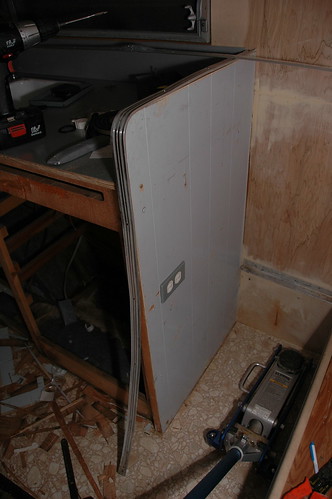
I thought this area (under the Sofa Bed) was solid... nope, the corners were toast too. Out this came too. My Jigsaw pictured there because my best friend in this situation.
I eventually had to remove just about all of the floor you see back to the back wall, and to get to it, you guessed it, the closet had to come out too.
See? the water damage destroyed the closet. Now let's talk about this for a second. Someone thought it would be a good idea to screw the closet in from the outside. So picture a wood frame, insulation and a tin skin. So before the skin, they screwed the closet to the ceiling frame. So without wanting to remove the whole ceiling and outer skin of the roof, I had to tear out the closet a small piece at a time. It was destroyed in the process. All that was salvaged was the drawers, handles, mirror, coat rack and these aluminum corners. ( I didn't take notes or enough pictures when removing it, had to rebuild it based on the holes and the marks in the ceiling. Oops!)
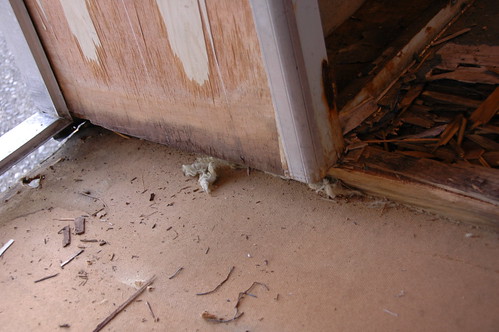
This shows the extent of the floor damage... it came up easier vaccuming it then anything else.
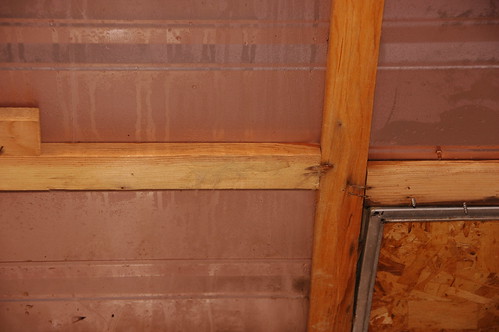
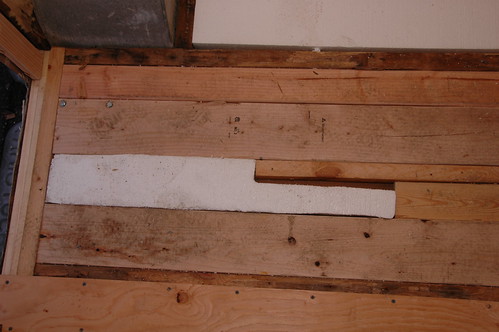
So everything out, rebuilt a lot of structure of the flooring (filled the heater's hole) new 2x6 and 2x4's all the way accross under the Kichenette. Solid! 5/8" plywood and 2" styrofoam insulation.
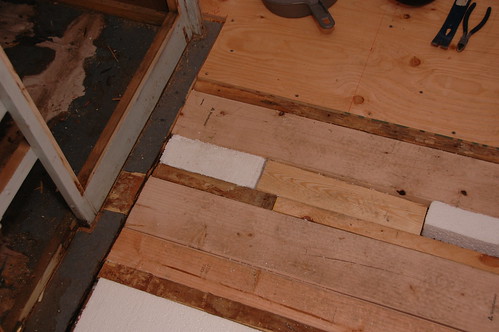
Here is a good shot of the new footer under the door frame, you see the original 2x2 then new 2x4, 2x6, foam, 2x6 and there is another 2x4 already covered to the right. Excessive? Nope!

Another shot... notice the lag bolts to the left? That is the steps... it was literally falling off the trailer when I brought it home. :( Good thing I got to her when I did!
More plywood, all screwed down really well. It compressed the foam as I screwed it down... nice and tight, no squeeks here!
New flooring put in and water tank re-installed
The front (wall replaced by the wheel well)

New floor all the way up!
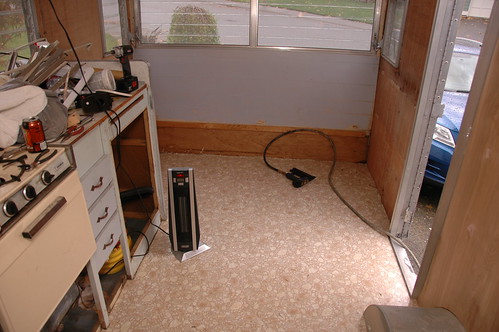
Much better! Now I have something solid to work with. Oh, and no heater grate to stub toes or burn little feet.
So out it came and I found myself removing a lot of flooring... all the way to the door crumbled once I got that vinyl tile up. Here we go.
I thought this area (under the Sofa Bed) was solid... nope, the corners were toast too. Out this came too. My Jigsaw pictured there because my best friend in this situation.
I eventually had to remove just about all of the floor you see back to the back wall, and to get to it, you guessed it, the closet had to come out too.
See? the water damage destroyed the closet. Now let's talk about this for a second. Someone thought it would be a good idea to screw the closet in from the outside. So picture a wood frame, insulation and a tin skin. So before the skin, they screwed the closet to the ceiling frame. So without wanting to remove the whole ceiling and outer skin of the roof, I had to tear out the closet a small piece at a time. It was destroyed in the process. All that was salvaged was the drawers, handles, mirror, coat rack and these aluminum corners. ( I didn't take notes or enough pictures when removing it, had to rebuild it based on the holes and the marks in the ceiling. Oops!)
This shows the extent of the floor damage... it came up easier vaccuming it then anything else.
So everything out, rebuilt a lot of structure of the flooring (filled the heater's hole) new 2x6 and 2x4's all the way accross under the Kichenette. Solid! 5/8" plywood and 2" styrofoam insulation.
Here is a good shot of the new footer under the door frame, you see the original 2x2 then new 2x4, 2x6, foam, 2x6 and there is another 2x4 already covered to the right. Excessive? Nope!
Another shot... notice the lag bolts to the left? That is the steps... it was literally falling off the trailer when I brought it home. :( Good thing I got to her when I did!
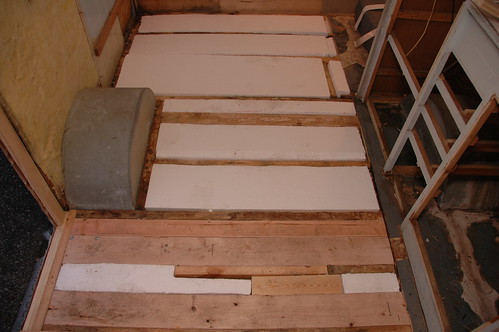
The rest of the Foam (removed a bit of the wall (back of the closet)
More plywood, all screwed down really well. It compressed the foam as I screwed it down... nice and tight, no squeeks here!
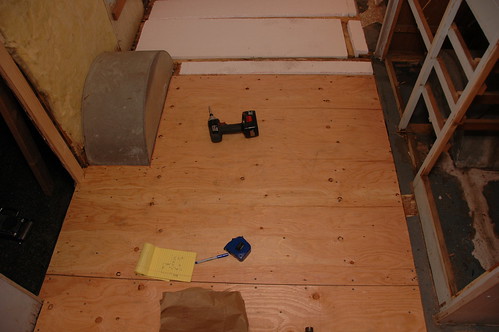
New flooring put in and water tank re-installed
The front (wall replaced by the wheel well)
New floor all the way up!
Much better! Now I have something solid to work with. Oh, and no heater grate to stub toes or burn little feet.
Next Step: Re-building the Closet back to it's previous glory (after a few rebuilds)
Subscribe to:
Comments (Atom)
